
Groups in Plek are made based on interests and relevance. Plek users can become a member of groups. In a group, you can communicate with other platform users. Groups can be made for example for departments, projects, or locations. Moreover, you can also create social groups. You can become a member yourself, or ask the group owner to become a member of the group. As a user at Plek, you can also create groups yourself.
What do you find on a group page?
To start, navigate to a group.
1. Swipe the computer mouse over groups in the navigation bar
2. Klick on a group.
You will be redirected to the group page of the group you selected.
Below you find a screenshot of the group page you will see. Below we explain to you the core functionalities numbered.
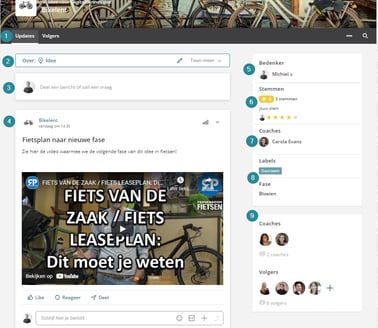
Group pages consist of the following components:
1. The menu items.
In the menu bar of the group, you find several functions. The group owner can decide which functions are enabled. Therefore, every group can have different functionalities available. The standard settings enable group messages, agenda, and documents. Besides these functions, group owners can also choose to enable group pages, group chat, and applications. Select one of the functions of the menu bar to go to the desired function.
2. About this group
In this field, you will find a description of the group. The description is unfolded the first time you visit the group. Once you have become a member the description automatically will be folded.
3. Post a message in the group.
Click on this field to start working on a new group message. You can then type and post something directly, or click on 'advanced' for more options (such as special formatting, attachments, or tags).
4. The timeline
Here you will see the messages posted by group members. Your own messages will also appear here. Messages are in chronological order.
5. The three dots, aka group settings and options.
If you are a member of the group, you will see it listed here. Click on 'Member' and then on 'Leave group' if you want to leave the group. For group administrators, the three dots allow you to adjust the group's settings.
6. The groupapplications.
A group administrator can add applications to his/her group. For example, a group administrator can make it easy for group members to access websites or tools that are relevant to them. For example, the accounting system for the finance department. A group application is displayed next to the group timeline. Group applications can also be found via the general app icon (the cubes in the menu bar).
7. The group members.
Here you can see the people who are members of this group and what function they have in this group. You can also click on 'Group Members' in the tabs to learn more about the members of this group.
8. Te subgroups within this group.
If subgroups exist within the group, you will see them listed here. Click on any of the subgroups to navigate to that subgroup's page.
9. The agenda.
Here you will find the upcoming group events. Click on any of the events for more information about the event.
10. The documents.
Here you will find the documents posted within this group. Click on one of the documents to open a preview. You can then download the document as well.
TIP!
You can find a similar explanation about the profile page (with a screenshot with instructions) here.