
Employee Journeys are an optional feature, and their availability depends on your organization’s Plek license. To find out if Journeys are included in your license, your admin can contact your account manager or reach out to support@plek.co.
The Journey Manager allows you to create, edit, and manage Journeys. By default, access to the Journey Manager is limited to admins. For more information about Journeys, please see this page.
Note: The ability to create new Journeys also depends on your Plek license.
To access the Journey Manager:
- Click on your profile picture (top right).
- Select Program Manager.
Journey Manager
In the Journey Manager overview, you'll find all Journeys that have been created for your organization.
From here, you can:
- Create a new Journey
- Quickly publish or unpublish an existing Journey
- Edit or delete a Journey
- View the results and progress of a Journey
Create a new Journey
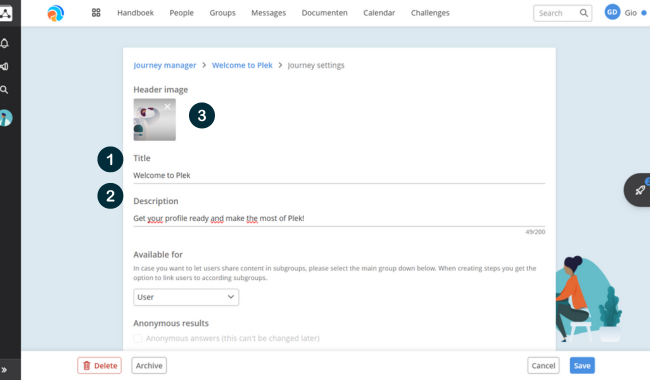
Step 1: Add a title, header image, and description
The first step in creating a new Journey is setting the tone and purpose with a clear title, an optional header image, and a short description.
- Title (1)
Give your Employee Journey a clear and relevant title. The title is the first thing users will see and should clearly reflect the purpose of the Journey—such as Onboarding new employees or Compliance training 2025. Keep it short and recognizable. - Description (optional)
Use the description (2) to briefly explain what the Journey is about, what users can expect, and why it's important. This helps set expectations and gives users context before they begin. - Header image (optional)
You can upload a header image (3) to make your Journey visually appealing and more engaging. This image appears at the left of the Journey when users open it.- Recommended format: JPG or PNG.
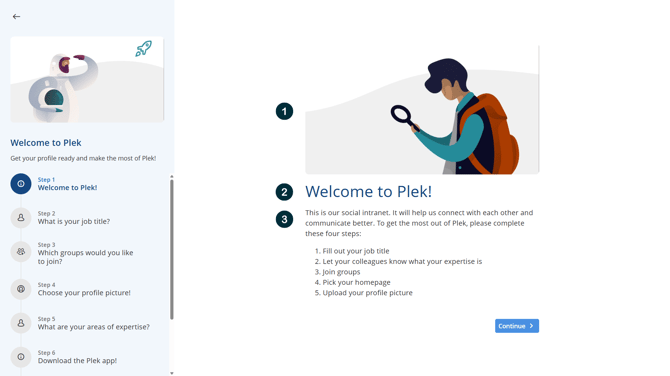
Here is how your Journey will appear:

Your image, title and desciption also shows in your Journey Manager and Journey Overview:

Step 2: Define your target group
After setting up your Journey’s title and description, the next step is to decide who should receive it.
You can define your target audience in several ways:
By Role (1)
Select one of the following roles (only one can be selected):
-
User – All internal users (users, content managers and admins)
-
External User – Only external users
-
Admin – Only admins

By Group (2)
-
Select one or more groups within your platform.
-
Choose whether to notify all group members, only group members with a role or just the group admins (3).

Filter your target audience
You can apply a filter to your target audience to specify a more focused subgroup within it.
- Click + Add Filter (4) to select profile fields such as department, role, or location.
- You can apply only one filter per Journey.
- Make sure the filter value matches exactly (note: case-sensitive) .
Optional: Anonymous Results
-
Enable this option if you want to collect responses anonymously (5).
-
You will see how many users completed the Journey, but not who they are.
-
⚠️ Once enabled and saved, this setting cannot be changed later.
Step 3: Configure the activation time
The activation time determines when a Journey becomes available to its target audience. You can use this setting to schedule Journeys in advance, ensuring they appear at the right moment—such as on a new employee's first day or during a specific campaign.
Select a start date
To set the start date, choose from the following options:
- On Publication – Starts immediately after publishing. Notifications are sent only to current existing users at the time of publication.
- Set Start Date – Schedule a start date in the future.
- Users will receive a notification when on the set start date.
- New users joining later will see the program in their overview but won’t get a notification.
- Start Based on Account Creation – Ideal for onboarding. Users receive a notification based on their account creation date.
- Start Based on Account Start Date – Used for pre-boarding workflows (with User Provisioning).
Select an end date
We recommend always setting up an end date (5) for your Journey. Once a Journey has passed the end date for a user, the Journey does not show up in My journey for that user

Example 1:
I plan to distribute a survey through the Journeys feature, targeting all users. The survey will commence on May 1st and conclude on June 1st.
Use settings:
Start date: May 1st
End date: 31 days after the Journey begins. This guarantees that all employees, including those starting in May, will see the Journey in My Journeys.
Example 2:
I aim to initiate an onboarding Journey for new employees.
The Journey should commence immediately upon creating an account on Plek for this user. I prefer that existing employees do not have access to this Journey.
Use settings:
- Start date: 0 days after ccount creation.
This implies that as soon as the account is set up and the new employee logs in, the Journey begins for this user. - End date: 30 days after the Journey starts.
This ensures that employees with accounts older than 30 days will neither be notified of this Journey nor see it in My Journeys.
Step 4: Set up notifications
Notifications help ensure that users are aware of their assigned Journeys and are reminded to complete them on time. When setting up a Journey, you can choose how and when users are notified.
Select one of the following options:
Normal (1)
- Appears in the rocket icon on the right.
- Visible in the Start of the Day section in the mobile app.
High (2)
Same as Normal, plus:- Push notification & email.
- A user will receive a notification when an Employee Journey begins, three days before the end date, and again one on the day of the end date.
Urgent (3)
- Same as High, plus:
- The program appears as a full screen pop-up upon login.
- Once closed, you can reopen the Journey again via My Journey.
Forced (4)
- Same as Urgent, but:
- The pop-up cannot be closed until the journey is completed.

Save Settings
After configuring your Employee Journey, save your configuration. You can now add Journey steps to your Employee Journey.
Edit, copy or delete a Journey
You can edit, copy or delete a Journey via the Journey manager. Click on the pencil next to the Journey you want to edit. The Journey shows all the steps in your Journey
- To edit a Journey step, click the pencil icon (1) for the step you want to edit
- To edit your Journey settings, click the edit button on the right (2)
- To make a copy of your Journey, click the copy button on the right. A copy of your Journey is made titled [title Journey] (clone), for example Welcome to Plek (clone)
- To delete a Journey, go the Journey settings (see point 2). You'll find the delete button on the left bottom of your screen.

Adding a step to your Journey
With Employee Journeys, you can add different kinds of content in eacht step to guide the end user through their Journey.
- You can refer to important pages or documents in Plek
- You can ask for feedback with a form
- You can help users setting up their Plek profile
Click +new step to add a new step. For every step, you can add:
- a header image (1)
- a title (mandatory)(2)
- text (3)
- an action, link to content or a form (4). You can read more about these in the subparagraphes below
To preview a journey, click on preview in the top right (5).

Your Journey step will appear as follows:
Joining a group
To help a user getting ready for your platform, you can suggest some groups they can join.
-
- Select Join groups
- Select the groups you want to suggest
- If left empty, the Journey step shows open groups as a suggestion

Your Journey step for suggesting groups, will appear as follows:

Selecting a language
If your organization offers support for multiple languages, you can include a step that allows users to select their preferred language.

Your Journey step for choosing a platform language, will appear as follows:

Please keep in mind that changing the language will only affect the user interface and not the content. When changing the language, the content will not be translated.
Filling in a profile field
Profile fields help users find each other more easily on the platform. These fields allow users to input specific information about themselves, such as their department, role, location, or other relevant details.
- Select Fill in profile field.
- Each step can include only one profile field for completion.
- Only profile fields that are available for users to edit, are available for a Journey step.
- Check the mandatory checkbox (1) , to make a profile field mandatory. This means that a user must complete the profile field before proceeding to the next Journey step.

Your Journey step featuring a profile field will appear as follows:

Upload a profile picture
A profile picture helps users finding each other on the platform. By adding this step to a Journey, you can help users getting platform ready.
- Select Upload profile picture.
- Profile pictures are always optional and cannot be mandatory.
- The ideal aspect ratio is 1:1. If another ratio is used, users can crop the image.

Your Journey step for uploading a profile picture will appear as follows:

Refer to a document
You can add an important document to your Journey step for users to read. Incorporating an important document into your Journey step allows users to access and read essential information that is crucial for their understanding and progression within the Journey.
- Make sure your document is uploaded in the Document module!
-
Select + Document in your Journey step .
-
You can search for your document via a search in the dropdown (1).
- If your organization integrates with Google Drive or Sharepoint, tick the checkbox (2) to search through documents in these external sources.
- If your organization integrates with Google Drive or Sharepoint, tick the checkbox (2) to search through documents in these external sources.
- You can add a read confirmation to your document (3). Readers need to open the document and check a read confirmation to continue to the next step.

Your Journey step featuring a document will appear as follows:

Refer to an infopage
You can refer to an important document to your Journey step for users to read. Including an infopage in your Journey step enables users to access and read important information essential for their Journey.
-
Select + Page in your Journey step.
-
You can search for your infopage via a search in the dropdown (1).
-
You can add a read confirmation to your document (2). Readers need to open the document and check a read confirmation to continue to the next step.

Your Journey step with infopage will will appear as follows:

Collect feedback with a form
You can use a form to collect feedback or input, for example during onboarding or for a short quiz.
-
Select + Form to add a form
- Select New form to create a new form
- Select Duplicate existing form to make a copy of one of your existing forms
- Please consult our help pages about forms, to learn more about forms.

Your Journey step featuring a form will appear as follows:


Publishing or Unpublishing Your Journey
Once all your Journey steps are configured, you can make your Journey live by publishing it. It will then be accessible to your users within the specified timeframe.
You have two options to publish or unpublish your Journey:
- Using the toggle in the Journey overview:
- Activate the toggle (1) for the Journey you wish to publish.
- Using the publish button in the Journey step overview:
- Select the edit button for the Journey you want to publish.
- Click on publish (2) at the top right.
-png.png?width=670&height=377&name=Untitled%20design%20(8)-png.png)
Need assistance with setting up a Journey or advice on configurations? Feel free to reach out to our support team at support@plek.co